Section 04-01: Suspension and Wheel Ends, Front | 1993 Mustang Workshop Manual |
REMOVAL AND INSTALLATION
 CAUTION: All front suspension fasteners are important attaching parts in that
they could affect the performance of vital parts and systems, and/or could
result in major service expense. Any part must be replaced with one of the same
part number or with an exact equivalent part if replacement becomes necessary.
Do not use a replacement part of lesser quality or substitute design. Torque
values must be used as specified during assembly to ensure proper retention of
this part.
Never attempt to heat, quench or straighten any front suspension part.
Replace with a new part.
Wheel Grease Seal and Bearing
Tools Required:
- Bearing Cup Installer (Inner) T73T-1202-B
- Bearing Cup Installer (Outer) T73T-1217-A
- Bearing Cup Puller T74F-1102-A
- Drive Handle T80T-4000-W
- Front Wheel Bearing Remover D80L-927-A
- Grease Retainer Remover TOOL-1175-AC
Replacement and Lubrication
- Raise the vehicle on a hoist until the tire clears the floor.
- Remove wheel from hub and rotor.
- Remove the caliper from the spindle, and wire it to the underbody to
prevent damage to the brake hose. Refer to Section 06-03.
- Remove the grease cap from the hub. Remove the cotter pin, nut retainer,
adjusting nut, and flatwasher from the spindle. Remove the outer bearing cone
and roller assembly.
- Pull the hub and rotor assembly off the spindle.
- Using Grease Retainer Remover TOOL-1175-AC or equivalent, remove and
discard the grease retainer. Remove the inner bearing cone and roller assembly
from the hub.
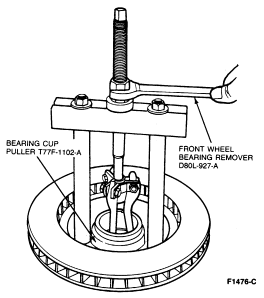
- Clean the inner and outer bearings and cups with solvent. Inspect the
bearings and cups for scratches, pits, excessive wear and other damage. Replace
parts as necessary if the cups are worn or damaged. Remove bearing cup(s) with
Front Wheel Bearing Remover D80L-927-A and Bearing Cup Puller T77F-1102-A or
equivalent.

- Wipe all old lubricant from the spindle and the inside of the hub. Cover
the spindle with a clean cloth, and brush all loose dust and dirt from the dust
shield. Carefully remove the cloth from the spindle to prevent
dirt from falling on it.
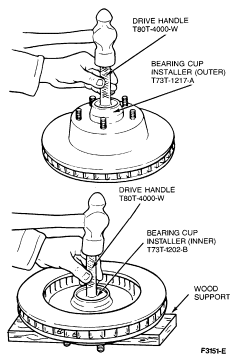
 CAUTION: When installing bearing cups, support the rotor on the hub barrel with
a wood block to avoid damage to wheel studs.
- If the inner or outer bearing cups were removed, install replacement cups
using the tools shown. Ensure that cups are seated properly in
the hub.

- Thoroughly clean old grease from the surrounding surfaces.
- Using a bearing packer, pack the bearing cone and roller assemblies with
Premium Long-Life Grease XG-1-C (ESA-M1C75-B) or equivalent. If a packer is not
available, work as much grease as possible between the rollers and cages.
Grease the cup surfaces.
- Place the inner bearing cone and roller assembly in the inner cup. Apply a
light film of Premium Long-Life Grease XG-1-C (ESA-M1C75-B) or equivalent to
the lips of a new grease retainer, and install the retainer. Ensure the retainer is properly seated.
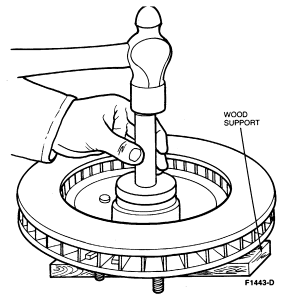
 CAUTION: When installing the grease retainer, support the rotor on the hub
barrel with a wood block to avoid damage to wheel studs.

- Install the hub and rotor assembly on the spindle. Keep the
hub centered on the spindle to prevent damage to the retainer and the spindle
threads.
- Install the outer bearing cone and roller assembly and flatwasher on the
spindle. Install the adjusting nut finger-tight. Adjust wheel bearings, as
outlined.
- Install grease cap taking care not to damage cap. Ensure cap is fully
seated.
- Install the caliper to the spindle. Refer to Section 06-03.
- Place wheel and tire on hub. Install the wheel lug nuts and tighten them
alternately to draw the wheel evenly against the hub and rotor.
- Lower the vehicle and tighten the wheel lug nuts to 115-142 Nm
(85-105 lb-ft). Install the wheelcover.
- Before driving the vehicle, pump the brake pedal several times to restore
normal brake pedal travel.
 CAUTION: All front suspension fasteners are important attaching parts in that
they could affect the performance of vital parts and systems, and/or could
result in major service expense. Any part must be replaced with one of the same
part number or with an exact equivalent part if replacement becomes necessary.
Do not use a replacement part of lesser quality or substitute design. Torque
values must be used as specified during assembly to ensure proper retention of
this part.

