Section 03-03: Engine Cooling | 1993 Mustang Workshop Manual |
REMOVAL AND INSTALLATION
Thermostat
5.0L Engine
Removal
- Partially drain the cooling system so that the coolant level is below the
thermostat.
- Disconnect the bypass hose at the thermostat housing.
- Note location of distributor and loosen hold down clamp, rotate the
distributor to gain access, if necessary.
- Disconnect the upper radiator hose at the thermostat housing.
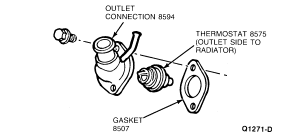
- Remove the two thermostat housing retaining bolts.
- Remove the thermostat housing and gasket.
Installation
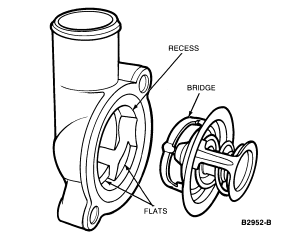
NOTE: To prevent incorrect installation of the thermostat, the water outlet
casting on all engines contains a locking recess into which the thermostat is
turned and locked. Install the thermostat with the bridge section in the outlet
casting. Turn the thermostat clockwise to lock it in position on the flats cast
into the outlet elbow.
- Clean the gasket surface on the thermostat housing and on the intake
manifold.
NOTE: The thermostat should be rotated slightly when installed in thermostat
housing to lock thermostat in place on flats cast into outlet elbow.
- Position the thermostat, gasket and thermostat housing to the manifold.
Install two retaining bolts and tighten to 16-24 Nm (12-17
lb-ft).
- Reposition the distributor for correct ignition timing, if necessary.
Tighten hold down bolt to 24-35 Nm (18-25 lb-ft).
- Connect the bypass hose at the thermostat housing.
- Connect the upper radiator hose to the thermostat housing and secure with
clamp.
- Fill the cooling system with the recommended 50/50 mixture of Premium
Cooling System Fluid E2FZ-19549-AA (ESE-M97B44-A and ESE-M97B43-A) or
equivalent and water.
- Start the engine and check all hoses and connections for leaks.
2.3L Engine
Removal
- Drain the cooling system so that the coolant level is below the thermostat.
- Remover upper radiator hose and save clamps.
- Disconnect the heater hose at the thermostat housing located on the LH
front lower side of engine.
 CAUTION: Do not pry or damage may result.
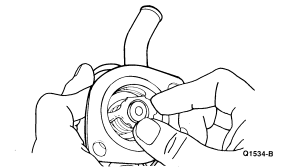
- Remove the coolant outlet housing retaining bolts. Pull the housing away
from the cylinder head to provide access to the thermostat. Remove the
thermostat by rotating counterclockwise in the housing until the thermostat
becomes free to remove.
- Remove gasket.
Installation
Clean the coolant outlet housing and cylinder head. Position the gasket
on the cylinder head opening.
CAUTION: The gasket must be positioned on the cylinder head, before the
thermostat is installed.
To prevent incorrect installation of the thermostat, the
water outlet casting on all engines contains a locking recess into which the
thermostat is turned and locked. Install the thermostat with the bridge section
in the outlet casting. Turn the thermostat clockwise to lock it in position on
the flats cast into the outlet elbow.
It is imperative that the rubber thermostat gasket be pressed and that
the correct thermostat installation alignment be made to provide coolant flow
to heater. Insert and rotate thermostat assembly to the left or right until it
stops in the water outlet housing. Visually check for full width of heater
outlet tube opening to be visible within the thermostat port in assembly. This
port alignment at assembly is required to provide maximum coolant flow to the
heater.
- Position the coolant outlet elbow against the gasket on the cylinder head.
Install and tighten the retaining bolts to 19-29 Nm (14-21
lb-ft).
- Connect upper radiator hose to coolant outlet elbow.
- Connect heater hose to thermostat housing.
- Fill the cooling system with the recommended Premium Cooling System Fluid
E2FZ-19549-AA (ESE-M97B44-A and ESE-M97B43-A) or equivalent as outlined.