Section 03-00: Engine—Service | 1993 Mustang Workshop Manual |
Replace the head if it is cracked. Do not plane or grind more than 0.254mm (0.010 inch) from original cylinder head gasket surface. Remove all burrs or scratches with an oil stone.
Cleaning
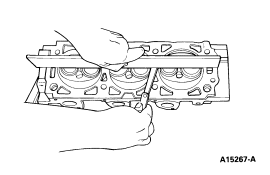
With the valves installed to protect the valve seats, remove deposits from the combustion chambers and valve heads with a scraper and a wire brush. Be careful not to damage the cylinder head gasket surface. After the valves are removed, clean the valve guide bores. Use cleaning solvent to remove dirt, grease and other deposits from the valves with a fine wire brush or buffing wheel.
Inspection
Inspect the cylinder heads for cracks or excessively burned areas in the exhaust outlet ports.
Check the cylinder head for cracks and inspect the gasket surface for burrs and nicks. Small imperfections of this type can be dressed down using an oil stone. Replace the head if it is cracked.
The following inspection procedures are for a cylinder head that is to be completely overhauled. For individual service operations, use only the pertinent inspection procedure.
Cylinder Head Flatness
Tools Required:
When a cylinder head is removed because of gasket leaks, check the
flatness of the cylinder head gasket surface for conformance to specification
using Straight Edge D83L-4201-A or equivalent and a feeler gauge. For
Specifications, refer to Section 03-01A (2.3L) or Section 03-01B (5.0L). If necessary
to refinish the cylinder head gasket surface, do not plane or
grind off more than 0.254mm (0.010 inch).
Valve Seat Runout
Tools Required:
Check the valve seat runout with Valve Seat Runout Gauge D81P-6002-E or
equivalent as illustrated below. Follow the instructions of the gauge
manufacturer. If the runout exceeds the wear limit, reface the valve and valve
seat. For Specifications, refer to Section 03-01A (2.3L) or Section 03-01B (5.0L). 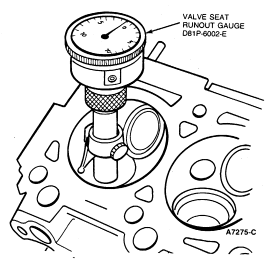
Valve Stem-to-Guide Clearance
Tools Required:
Check the valve stem-to-valve guide clearance of each valve in its respective valve guide with Valve Stem Clearance Tool TOOL-6505-E or equivalent. Use a flat-end indicator point.
Install the tool on the valve stem until it is fully seated, and tighten
the knurled setscrew firmly. Permit the valve to drop away from its seat until
the tool contacts the upper surface of the valve guide. 
Position Rotunda Dial Indicator with Bracketry 014-00282 or equivalent with its flat tip against the center portion of the tool's spherical section at approximately 90 degrees to the valve stem axis. Move the tool back and forth in line with the indicator stem. Take a reading on the dial indicator without removing the tool from the valve guide upper surface. Divide the reading by two, the division factor for the tool. If valve stem-to-valve guide clearance exceeds the wear limit, ream the valve guide for the next oversize valve stem as outlined under Valves.
Valves, Select Fitting
If the valve stem-to-valve guide clearance exceeds the service clearance, ream the valve guide for the next oversize valve stem. Valves with oversize stem diameters of 0.38mm and 0.76mm (0.015 inch and 0.030 inch) are available for service in diameters of 0.41mm and 0.81mm (0.016 inch and 0.032 inch) oversize. Always reface the valve seat after the valve guide has been reamed. Refer to Valve Guides, Reaming.
In the case of valve stem-to-valve guide clearance, the service clearance is intended as an aid to diagnosing engine noise only, and does not constitute a failure or indicate need for service. However, when overhauling or reconditioning a cylinder head, the service clearance should be regarded as a practical working value, and used as a determinant for installing the next oversize valve to ensure extended service life.
Valve Guides, Reaming
 CAUTION: Always reface the valve seat after the valve guide has been reamed,
and use a suitable scraper to break the sharp corner (ID) at the top of the
valve guide.
CAUTION: Always reface the valve seat after the valve guide has been reamed,
and use a suitable scraper to break the sharp corner (ID) at the top of the
valve guide.
If it becomes necessary to ream a valve guide to install a valve with an
oversize stem, a hand reaming kit is available which contains the following
reamer and pilot combinations: a 0.38mm (0.015 inch) OS reamer with a 0.76mm
(0.03 inch) OS pilot, and a 0.76mm (0.03 inch) reamer with a 0.38mm (0.015
inch) OS pilot. 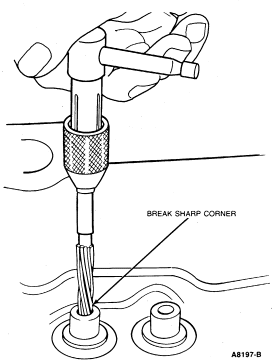
When replacing a standard size valve with an oversize valve, always use the reamer in sequence (smallest oversize first, and then next smallest, etc.) so as not to overload the reamers.
NOTE: If oversize valve stems and oversize stem seals are not available, bore out original guide and install service bushing. Ream ID for specified clearance for standard size valve. Reface valve seat, as required. Install standard size valve stem oil seal.
CAUTION: The interference angle of the valve and seat should not be lapped out.
Remove all grooves or score marks from the end of the valve stem, and chamfer
it as necessary. Do not remove more than 0.254mm (0.010 inch) from the end of
the valve stem.
If the valve face runout is excessive and/or to remove pits and grooves, reface the valves to a true 45 degree angle. Remove only enough stock to correct the runout or to clean up the pits and grooves. If the edge of the valve head is less than 0.794mm (1/32 inch) thick after grinding, replace the valve as the valve will run too hot in the engine.
If the valve and/or valve seat has been refaced, it will be necessary to check the clearance between the rocker arm pad and the valve stem with the valve train assembly installed in the engine.
Valve Seats, Refacing
Measure the valve seat width. Reface the valve seat(s) if the width is not within specifications. Refer to Section 03-01A (2.3L) or Section 03-01B (5.0L) for specifications.
Refer to Engine Service Section in the Rotunda Tool catalog for a description of the various types of valve seat grinders and cutters available.
Refacing the valve seat should be closely coordinated with the refacing of the valve face so that the finished seat and valve face will be concentric and the specified interference angle will be maintained. This is important so that the valve and seat will have a compression-tight fit. Ensure refacer grinding wheels are properly dressed.
Grind the valve seats of all engines to a true 45 degree angle. Remove
only enough stock to clean up pits and grooves or to correct the valve seat
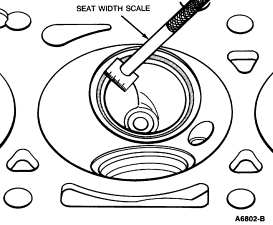
runout. After the seat has been refaced, use a seat width scale or a machinist
scale to measure the seat width. Narrow the seat, if necessary, to bring it
within specification. Refer to Section 03-01A (2.3L) or Section 03-01B (5.0L) for
specifications. 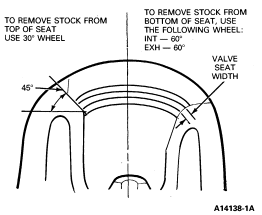
If the valve seat width exceeds the maximum limit, remove enough stock from the top edge and/or bottom edge of the seat to reduce the width to specification.
On the intake and exhaust seats, use a 60 degree angle grinding wheel to remove stock from the bottom of the seat (raise the seats). A 30 degree angle wheel is used to remove stock from the top of the seats (lower the seats).
The finished valve seat should contact the approximate center of the valve face. It is good practice to determine where the valve seat contacts the face.
To do this, coat the seat with Prussian Blue and set the valve in place. Rotate the valve with light pressure. It the blue is transferred to the center of the valve face, the contact is satisfactory. If the blue is transferred to the top edge of the valve face, lower the valve seat. If the blue is transferred to the bottom edge of the valve face, raise the valve seat.
Valves
The critical inspection points and tolerances of the valve are illustrated. Refer to Specifications in Section 03-01A (2.3L) or Section 03-01B (5.0L) for service limits.
Inspect the valve stem for bends, and the end of the stem for grooves or scoring.
Inspect the valve face and the edge of the valve head for pits, grooves or scores. Inspect the stem for a bend condition and the end of the stem for grooves or scores. Check the valve head for signs of burning or erosion, warpage and cracking. Minor pits, grooves, etc., may be removed. Discard severely damaged valves.
Inspect the valve spring assembly, valve spring retainers, locks and sleeves and discard any visually damaged parts.
Valves, Refacing
CAUTION: Discard any excessively worn or damaged valve train parts.
Minor pits or grooves may be removed. Discard valves that are severely damaged, if the face runout cannot be corrected by refinishing, or stem clearance exceeds specification. Refer to Section 03-01A (2.3L) or Section 03-01B (5.0L) for specifications.
Refer to Engine Service Section in the Rotunda Tool catalog for a description of the various types of valve resurfacing equipment.
The valve refacing operation should be closely coordinated with the valve seat refacing operations so that the finished angles of the valve face and valve seat will be to specifications and provide a compression-tight fit.
Ensure refacer grinding wheels are properly dressed. Refer to the
following illustration for critical valve dimensions. 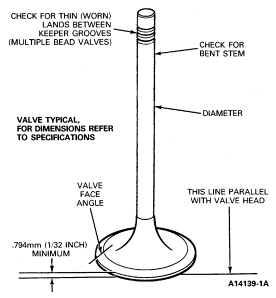
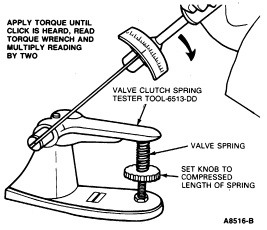
Valve Spring Tension
Tools Required:
Inspect the valve spring, valve spring retainers, and keys for wear or damage. Discard any damaged parts.
Check the springs for proper pressure at the specified spring lengths using Valve Clutch Spring Tester TOOL-6513-DD or equivalent. Weak valve springs cause poor engine performance. Replace any spring not within specification. For specifications, refer to Section 03-01A (2.3L) or Section 03-01B (5.0L). Manually rotating the valve spring assemblies while installed in the engine, will not determine condition of valve springs.
NOTE: Ensure the springs are reassembled to their OWN ORIGINAL DAMPERS by pushing damper on the spring. DO NOT OPEN damper with any kind of tool in order to reassemble.
Valve Spring Squareness
Check each spring for squareness using a steel square and a flat surface.
Stand the spring and square on end of the flat surface. Slide the spring up to
the square. Revolve the spring slowly and observe the space between the top
coil of the spring and the square. 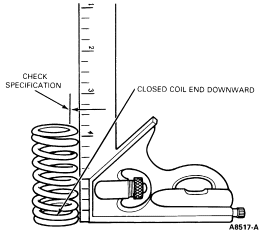
Refer to specifications in Section 03-01A (2.3L) or Section 03-01B (5.0L) for out-of-square limits. Follow the same procedure to new valve springs before installation.
NOTE: Ensure the proper spring (color-coded) is installed.
NOTE: Ensure the springs are reassembled to their OWN ORIGINAL DAMPERS by pushing damper on the spring. DO NOT OPEN damper with any kind of tool in order to reassemble.