Section 01-08: Trim, Exterior | 1993 Mustang Workshop Manual |
REMOVAL AND INSTALLATION
Before removing the exterior mouldings, it should be determined by the
type of retainer used whether a respective door, quarter or luggage compartment
trim panel must first be removed to provide access.
If a weld stud is distorted or broken off, it should be replaced with a
screw (Part No. 379560-S101).
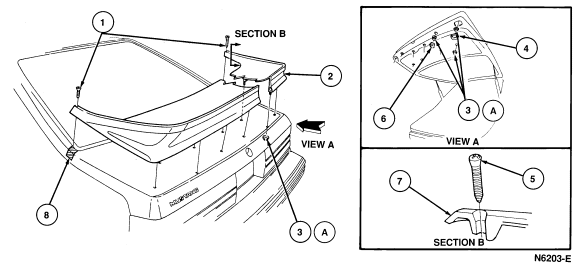
Spoiler
GT
Removal
- Open rear hatch.
- Remove plug buttons and trim panel.
- Remove four nut and washer assemblies retaining rear spoiler to hatch and
remove rear spoiler.
- To remove the outside extension assemblies, remove four nuts (two each
side), remove extension from spring nut and remove from vehicle.
Installation
- Position outside extension assemblies to vehicle by positioning to spring
nut.
- Secure the extension assemblies with four nuts (two each side). Tighten to
4-6 Nm (36-53 lb-in).
- Position spoiler to hatch, secure with four nut and washer assemblies.
Tighten to 4-6 Nm (36-53 lb-in).
- Install trim panel and plug buttons.

Item |
Part Number |
Description |
|
1
|
384112-S55X
|
Screw
|
|
2
|
41602
|
Spoiler
|
|
3A
|
373556-S36
|
Nut and Washer (10 Req'd)
|
|
4
|
378444-S
|
Plug Button
|
|
5
|
53073-S43BX
|
Screw
|
|
6
|
385523-S
|
Plug Button
|
|
7
|
—
|
Hatch Outside Panel Rear Extension Assy
|
|
8
|
99J291
|
Tape
|
|
A
|
|
Tighten to 4-6 Nm (36-53 Lb-In)
|
Except GT, Cobra
Removal
- Open rear hatch.
- Remove plug buttons and trim panel.
- Unplug high mount stoplamp connector.
- Remove 10 nuts and washers retaining spoiler to hatch.
- Close hatch.
- Remove two spoiler retaining screws.
- Lift spoiler about 2 inches and unplug wiring harness grommet from hatch.
- Remove spoiler.
Installation
- Insert high mount stoplamp connector into hatch access hole.
- Position spoiler with studs in holes in hatch.
- Install two spoiler retaining screws.
- Open hatch.
- Pull on wiring connector to secure grommet in hatch.
- Install 10 nuts and washers. Tighten nuts to 4-6 Nm (36-53
lb-in).
- Connect high mount stoplamp connector.
- Install trim panel and plug buttons.
- Close hatch.
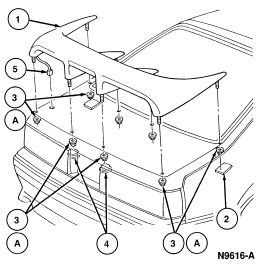
Cobra
Removal
- Open rear hatch.
- Remove trim panel.
- Remove plug buttons and tape.
- Unplug high mount stoplamp connector, found in left rear plug button well.
- Remove eight nuts and washers retaining spoiler to hatch.
- Lift left end of spoiler approximately 2 inches, and unplug wiring harness
grommet from hatch.
- Remove spoiler.
Installation
- Insert high mount stoplamp connector into hatch access hole.
- Position spoiler with studs in holes in hatch.
- Pull on wiring connector to secure grommet in hatch.
- Install eight nuts and washers. Tighten to 3-5 Nm (27-44
lb-in).
- Connect high mount stoplamp connector.
- Install trim panel, plug buttons and tape.
- Close hatch.

Item |
Part Number |
Description |
|
1
|
41602
|
Spoiler
|
|
2
|
995291
|
Tape
|
|
3A
|
45335-S36
|
Nut and Washer Assy (8 Req'd)
|
|
4
|
3784445
|
Plug Button
|
|
5
|
13A613
|
High Mount Stoplamp
|
|
A
|
|
Tighten to 3-5 Nm (27-44 Lb-In)
|

