This bulletin supersedes 24-2186. Reason for update: update the vehicle model years affected
Ford 2021-2023 Bronco | Factory soft top roof |
Issue:
Some 2021-2023 Bronco vehicles equipped with a factory soft top roof may exhibit a headliner that is detaching from the soft top material. This may be due to the factory installation process. To correct this condition, follow the Service Procedure to reattach the headliner or replace the soft top roof material.
Action:
Follow the Service Procedure to correct the condition on vehicles that meet all of the following criteria:
•
2021-2023 Bronco
•
Equipped with a factory soft top roof
•
Headliner detaching from the soft top material
| Service Part Number | Claim Quantity | Package Order Quantity | Description | Note | | Obtain LocallyObtain Locally | 1 | 1 | 1.5 In. Rubber J-Roller | | | 164-R9343164-R9343 | As Needed | As Needed | 3M™ Film Tape 9343 | Rotunda part number | | Obtain LocallyObtain Locally | As Needed | As Needed | Gorilla® Heavy Duty Spray Adhesive | | | Obtain LocallyObtain Locally | As Needed | As Needed | Lint-Free Towel | | | Obtain LocallyObtain Locally | As Needed | As Needed | Painter's Tape | | | Obtain LocallyObtain Locally | As Needed | As Needed | Powder-Free Disposable Gloves | |
| Service Part Number | Claim Quantity | Package Order Quantity | Number in Package | Description | | M2DZ-7852700-BDM2DZ-7852700-BD | Only If Necessary (1 Possible) | Only If Necessary (1 Possible) | 1 | Soft Top Material | | W790580-S900W790580-S900 | Only If Necessary (25 Possible) | Only If Necessary (7 Possible) | 4 | Rivet |
Claim Quantity refers to the total number of individual pieces required to repair the vehicle.
Package Order Quantity refers to the amount of the service part number package(s) required to repair the vehicle.
Number In Package refers to the number of individual pieces included in a service part number package.
As Needed indicates the part is necessary but amount of the part may vary and/or is not a whole number. Parts can be billed out as non-whole numbers, including less than 1.
Only If Necessary indicates the part is not mandatory. Refer to the Service Procedure to determine the inspection/inclusion criteria. Warranty Status: Eligible under provisions of New Vehicle Limited Warranty (NVLW)/Service Part Warranty (SPW)/Service Part New Vehicle (SPNV)/Extended Service Plan (ESP) coverage. Limits/policies/prior approvals are not altered by a TSB. NVLW/SPW/SPNV/ESP coverage limits are determined by the identified causal part and verified using the OASIS part coverage tool. | Description | Operation No. | Time | | 2021-2023 Bronco: Reattach Or Replace The Soft Top Roof Material Following The Service Procedure (Do Not Use With Any Other Labor Operations) | MT242265 | Actual Time |
| Causal Part: | 7852700 | | Condition Code: | D4 |
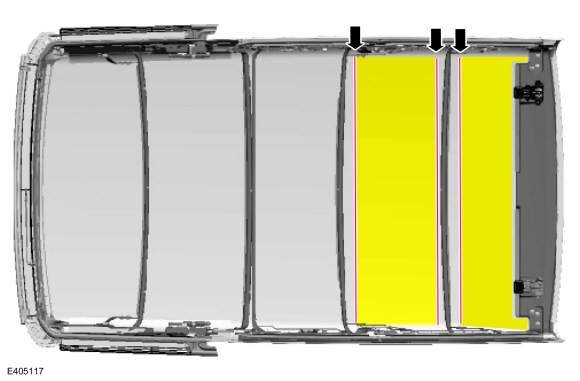
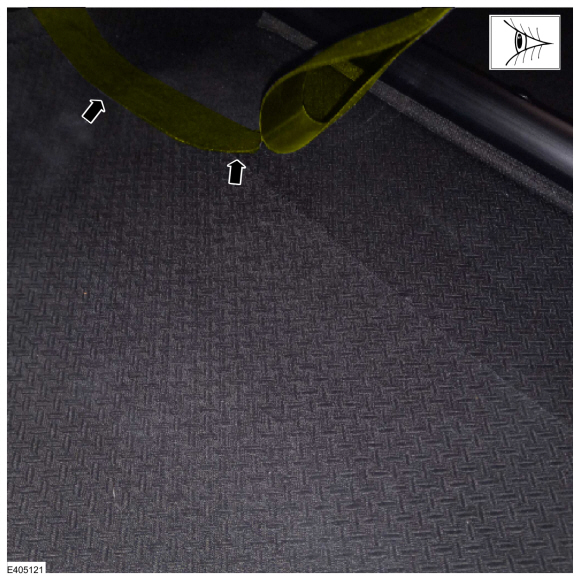
1. The soft top material has 2 separate sections of headliners, refer to Figure 1 for locations. Are either of the 2 headliners completely detached from the soft top material and/or damaged, such as stretched, cut and/or warped? (Figures 1-3)
(1). Yes - replace the soft top material. Refer to WSM, Section 501-18A. Repair is complete.
(2). No - proceed to Step 2.
Figure 1 - View from underside of the soft top assembly. Both headliner locations shown.
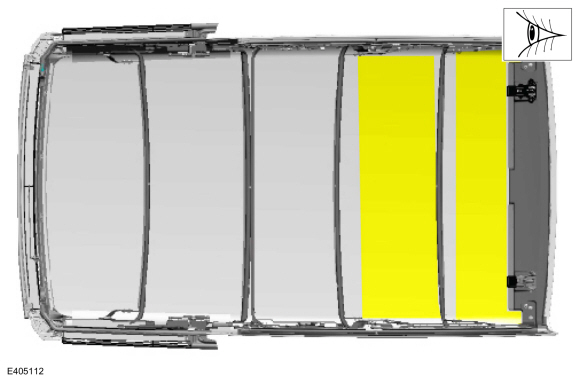
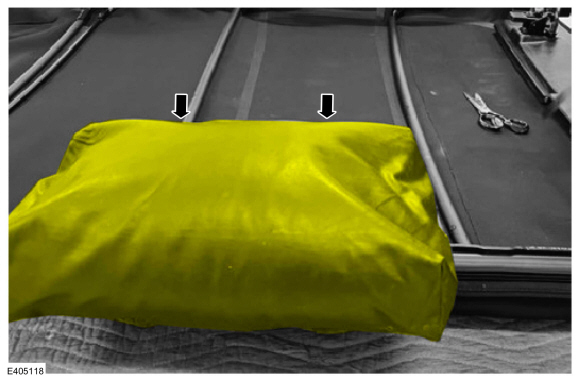
Figure 2 - Example of an undamaged, partially detached headliner that can be repaired
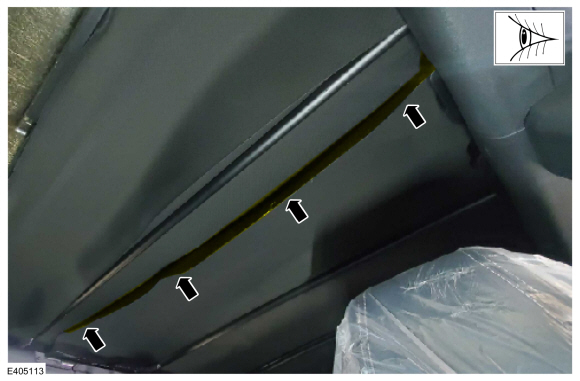
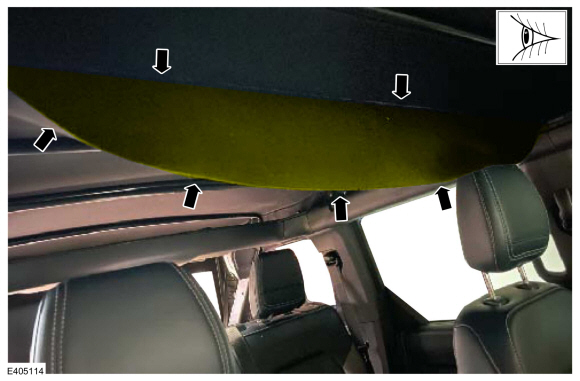
Figure 3 - Example of an undamaged, partially detached headliner that can be repaired
2. Has an attempt already been made to reattach either headliner using glue, tape, or any kind of adhesive?
(1). Yes - replace the soft top material. Refer to WSM, Section 501-18A. Repair is complete.
(2). No - proceed to Step 3.
3. With help from an assistant, remove the soft top assembly from the vehicle and place it on a large clean tarp or blanket on the ground. Refer to WSM, Section 501-18A > Removal and Installation > Soft Top Assembly.
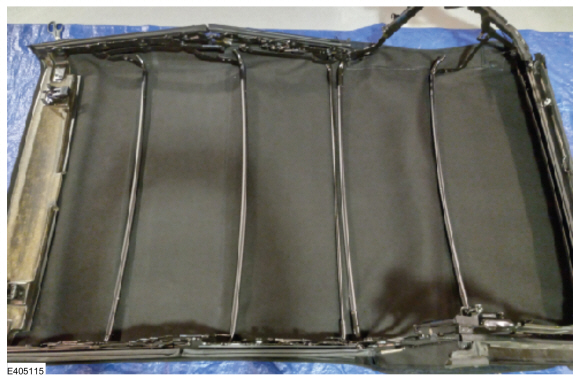
4. With help from a second person, turn the soft top assembly upside down keeping the soft top assembly on the clean tarp or blanket. Carefully open the soft top assembly so that it is in the fully open position and be sure it remains upside down. (Figure 4)
Figure 4
5. Use a damp, clean, lint-free cloth to wipe down the entire inside fabric of the soft top material and headliners. If needed, a vacuum can be used to assist with cleaning.
6. Reattach the applicable headliner(s) to the soft top material using the Gorilla® Heavy Duty Spray Adhesive.
(1). Perform this step on all sections of the headliner(s) that have become partially detached.
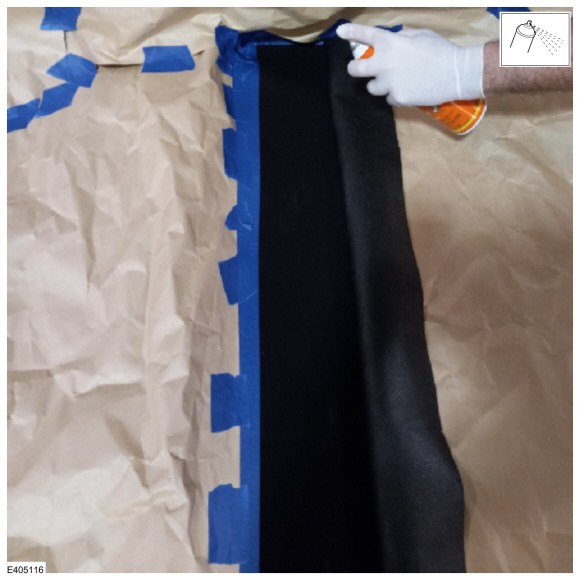
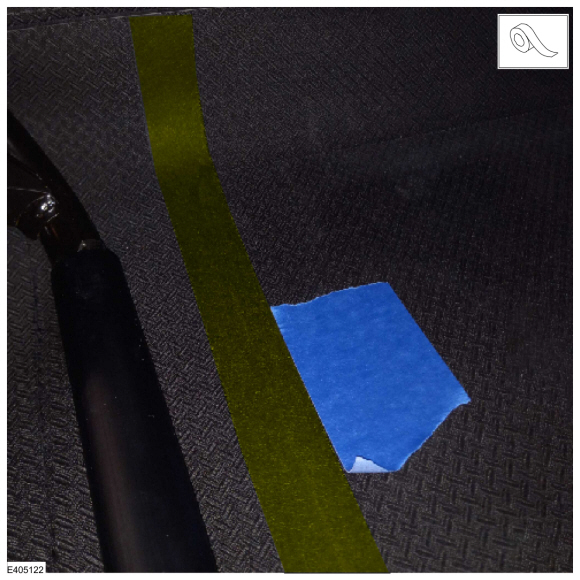
(2). Prepare the soft top material and headliner(s) for reattachment with the spray adhesive by taping off the surrounding areas with painter’s tape. Use paper and/or cardboard to add further protection. Only the inner section of the headliner (that has detached) and the mating surface of the headliner (soft top material) are sprayed with the adhesive. Make sure that adhesive overspray does not occur to the surrounding areas or components, or soft top material replacement may be required. (Figure 5)
Figure 5 - Showing a properly covered area ready for spray adhesive
(3). Follow the directions on the can to apply the Gorilla® Heavy Duty Spray Adhesive to the inside portions of the headliner(s) and the portions of the soft top material that it will adhere to. Wear powder-free disposable gloves during this process.
(4). Once the spray adhesive is applied to the mating surfaces, work quickly to lay the headliner(s) back into place on the soft top material, starting in the middle working outwards. Use your hands to apply outward pressure on the headliner to remove bubbles and/or creases and to be sure the headliner is in the correct/original location.
(5). Remove all protective material (tape/paper/cardboard). Proceed to Step 7.
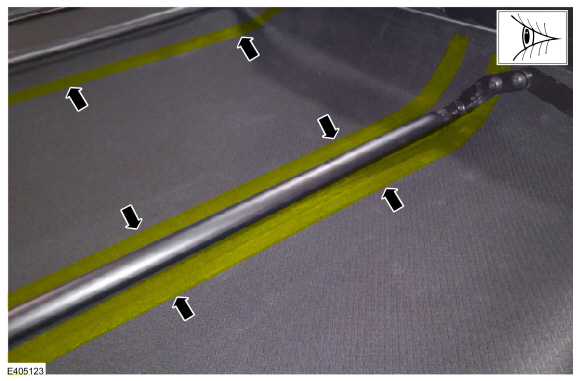
7. Install 3M™ Film Tape 9343 over the cross-car headliner seams.
(1). Tape all 3 cross-car headliner seams regardless of if they were becoming partially detached or not. Refer to Figure 6 for cross-car headliner seam locations.
Figure 6 - Showing all 3 headliner seams that must be taped
(2). Place a 50 lb. (22.6 kg) sandbag (or similar item) on each the side of the frame to weigh down the raised hinged sections of the frame. This flattens the soft top assembly for easier application. If needed, place a clean cloth underneath the sandbags to prevent the soft top assembly from getting dirty. Refer to Figure 7.
Figure 7 - Sandbag shown on top of frame hinge location. Left side shown, right side similar.
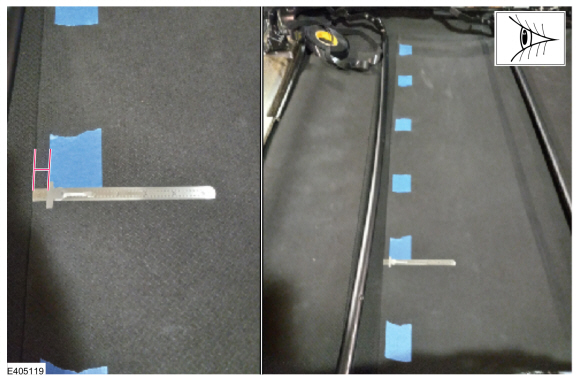
(3). Install the 1 in. (25 mm) wide film tape with half of its width on the headliner and half on the soft top material to create a permanent bond between the two surfaces. To aid in installation, create a guide for the film tape by placing pieces of painter’s tape exactly 0.5 in. (13 mm) from the headliner edge, approximately every 6 in. (150 mm) apart, across the entire length of the seam. Refer to Figure 8.
Figure 8
(4). Wear powder-free disposable gloves while handling the film tape. Oil from hands can reduce the tape’s adhesion if contact occurs.
(5). Cut one continuous section of film tape to a total length of at least 100 in. (2540 mm).
(6). Set the center point of the cut section of film tape on the middle of the soft top assembly. This leaves extra tape on each end of the soft top assembly. Beginning on one side, approximately 12 in. (30 cm) away from one edge of the seam, peel the tape backing in small increments as needed (do not remove the entire length of the tape backing all at once) and lightly install the tape following the 0.5 in. (13 mm) tape guidelines. Be sure that half of the tape width is on the headliner and the other half on the soft top material, creating a straight/uniform line, refer to Figures 9-10. Do not stretch the tape at any point before or during the application. Film tape is extremely pliable which allows it to have excellent adhesion to the fabric. If it is installed while being stretched, it retracts over time which causes it to lose adhesion, refer to Figure 10.
Figure 9 - Showing proper tape Installation following the taped guidelines.
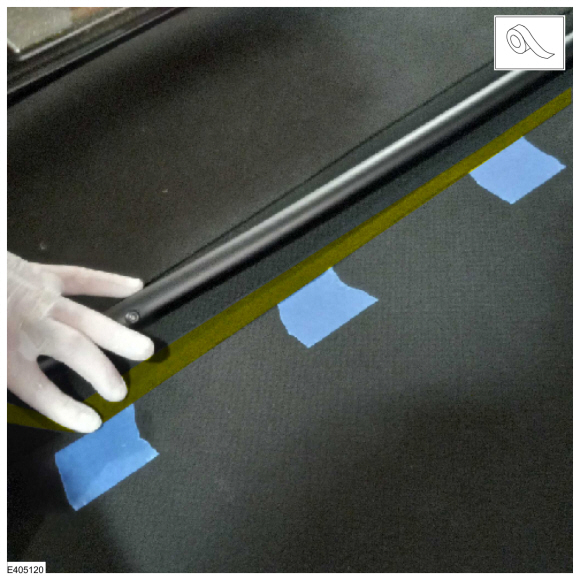
Figure 10 - Showing proper tape installation. Do not stretch tape and only remove backing as needed.
(7). When the section of film tape reaches the end of the headliner seam, continue to tape in a straight line all the way to the edge of the soft top seam. Allow the tape to stay loose during application. Cut the end of the film tape so that it ends just before the soft top material edge but do not tape past the edge, which runs perpendicular to the tape routing. Be sure that 100% of the film tape is secured and flat to the surface. Do not leave any sections of tape loose/unattached, as this causes tape to peel over time. Perform this step on the opposite edge of the section of film tape, then proceed to the next step. (Figure 11)
Figure 11 - Showing proper tape installation on the edge of the soft top material.
(8). Inspect the installed film tape for straightness, proper 50/50 adhesion to the headliner and soft top roof material across the entire length of the headliner, film tape peeling (occurs when tape is stretched during installation), and both vertical edges to ensure proper adhesion with no lift of the tape present. If any of these problems exist, perform Step 7 again with a fresh section of film tape.
(9). While wearing powder-free gloves, use hands to apply pressure across the entire length of the section of film tape.
(10). Protect the entire length of the soft top frame bow covers with painter’s tape, then use a rubber 1.5 in. J-roller to fully press the film tape into the soft top material.
(11). Perform Steps 7(3) - 7(10) on the remaining 2 headliner seams.
Figure 12 - Showing a complete installation of film tape along all three cross-car headliner seams
(12). Reinspect all 3 installed sections of film tape. Inspect for tape straightness, proper 50/50 adhesion to the headliner and soft top roof material across the entire length of the headliner, film tape peeling (occurs when tape is stretched during installation), and both vertical edges to ensure proper adhesion with no lift of the tape present. If any of these problems exist, repeat Step 7 on any failed sections using a fresh piece of tape.
8. Use a damp, clean, lint-free cloth to wipe down the entire inside section of the soft top material and headliners.
9. With help from an assistant, carefully place the soft top assembly in the fully closed position. Refer to WSM, Section 501-18A > Removal and Installation > Soft Top Assembly.
10. With help from an assistant, install the soft top assembly back onto the vehicle. Refer to WSM, Section 501-18A > Removal and Installation > Soft Top Assembly.
|